Manage task definitions
Use the Manage Task Definitions page to create, edit, clone, and organize task definitions for an event. This page shows all the task definitions in your system and how they are organized in a task workflow (including parent/child dependencies).
To access: navigate to Events & Forms > Manage Events, then click Edit Tasks beside an event.
Key info
- Task definitions are listed with their assignees and dependency relationships visible.
- Dependent tasks (children) appear indented below their parent task.
- Use the action icons beside each task to add dependent tasks, clone, retire, or unassociate.
- Changes to the task workflow must be published before they take effect on new event launches.
- You can reorder tasks using a unique ID (as defined by your organization) if you prefer a non-alphabetical order.
Good to know
- Parent/child hierarchy with dependent tasks: child tasks become active after the parent task completes.
- A document icon beside a task name indicates a form or document is attached.
Create a task definition
- From the navigation bar, click Administration>Manage Events.
The Manage Events page opens.
- In the list beside an event, click Edit Tasks.
The Manage Task Definitions page opens.
- Click Create Unassociated Task.
- Complete fields on these tabs:
- Click Save.
Details
Title
Enter a task title as it will appear in the summarized task lists and reports.
Task Definition ID
Enter a unique (string) identifier for the task. The definition ID is optional but recommended. It can be used to cross reference a task with an external source. The definition ID is also:
An available filter criteria for tasks in the Add a Task option on the dashboard.
The sort criteria for the display on the Manage Task Definition page.
Task Description
Enter a description to appear in the Task Summary page.
Reassignment
Make one or more selections to affect how the task can be assigned:
The Restrict reassignment to Event Coordinator check box applies to the ability to assign a task to a different employee. If you check this option, only the event coordinator can assign the task.
The Restrict reassignment to within the Team check box applies to who the task can be assigned to. If you check this option, the Assign link allows the employee to choose only members of the assigned team.
Reopen
Make one or more selections to affect how the task can be re-opened:
The Restrict reopen to Event Coordinator check box applies to the ability to assign a task to a different employee. If you check this option, only the event coordinator can assign the task.
The Always reopen dependent tasks check box applies to automatically reopening dependent task(s) if the parent task is reopened. If you check this option, the dependent tasks will automatically be reopened if the parent task in the task workflow is re-opened.
Completion
Make one or more selections to affect how the task can be completed:
The Task cannot be completed from the task summary page check box applies if you do not want the benefiter to be able to complete the task through the Task Summary page. A task restricted with this option must be Save and Completed through a custom portal page (or some execution of the web service call). The Save and Completed button will not be available on the Task Summary page.
The Is self completing check box applies to set this task to be a self-completing task. A self-completing task is marked completed as soon as it is activated. Self-completed tasks are useful as notification style tasks (sending notifications).
The Task can only be completed on a mobile device check box indicates that the task can only be completed from a mobile device.
Completed before activation
Select one of the following to control how the task can be completed before activation:
Never
By Event Coordinator Only
Employee instructions
Enter user instructions for completing this task. The assignee can view them on the Task Summary page. Employee instructions can also be included in a task type notification message.
Text Editor
Using the Text Editor, you can include rich text, font, links, tables, images, and more to supporting content in your task instructions. (Support can configure a default folder for links and images.)
If you add a link to an external website, note that the system handles it based on whether or not it is a trusted site. A client administrator adds trusted sites to your system.
Keywords
The Employee Instruction field can contain (predefined) keywords. Keywords are optional. Available keywords are:
- insertForm: Links to a specific form
- insertesurvey: Links to the survey selected in the Pick Survey Form list
- PRINT_ALL_FORMS: "Print all printable forms" link is added
- Insert_lesson_link: Links to the eCourse or eCourses selected in the Learning Course Selection list
Advanced Option: Variable Information
The Employee Instruction field can contain (predefined) employee information as seen on the Employee Profile page of the Find Employee page. Including employee information in the task description is optional.
Adding variable information to the task description message for the employee is similar to using fields for a mail merge application. You may add fields to the instruction text which will be replaced with the employee information when the page is viewed.
The following tag must be included in the description text for the predefined values to be included:
<$include;/RedCarpetDotNet/Forms/FormTables>
Each field is available through its predefined tag. The syntax of the tag is:
<$client.tForWhomUserInfo.fieldVariable>
where the fieldVariable is the underlying field in your Employee Profile page. If you are not sure of the exact spelling of your field variables, the underlying field variable syntax available by choosing "Show Employee Profile Fields" in the Notification definitions page.
If you are using the Notifications definitions page to collect your Employee Profile field names, use the field variable as you see it in the list. The list might display: EmergencyContact
The notification field will be: [$EP_EmergencyContactInfo$]
The syntax to use in the task definition Employee Instructions is:
Your emergency contact is: <$client.tForWhomUserInfo.EmergencyContact>
Contact Support for additional information for help with the syntax of your implementation.
Form or Document options
Form or document options are available when you select the Create Unassociated Task button on the Manage Task Definitions page.
Do not include a Form or Document
Click this option to NOT include a Form or document.
Include a Form to fill out or review
Click this option to associate a form for data collection or review. This option applies if task assignee is going to add any data to the form or mark the form as finished upon task completion.
Select a Form from the drop-down list. The Forms listed are filtered based on your permissions and permissions associated with the form when it was created.
Tip: If you select an I-9 compliant Form, the keywords insertform or insertForm must be included in the Employee Instructions box. Otherwise, the I-9 step number compliance rules are not available for selection.
Select any additional options.
Request a document to be uploaded
Click this option to request a document to be uploaded during this task. Select a upload type from the drop-down list.
Select the Upload is required to complete task check box if you want to make the user upload a document to complete the task. If not selected, the task can be completed if a document is not uploaded.
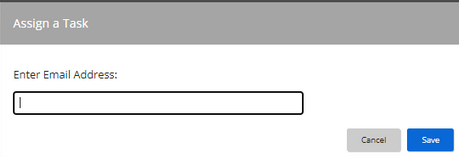
Select the Allow task to be assigned to an email check box if you want the document task to be assigned to an email address. When the benefiter runs the tasks, they can assign the task to an email address by entering an email address and clicking Save:
Request a document to be review
Click this option to request a document to be reviewed during this task. Select an upload type from the drop-down list.
Note: This option applies to employer-uploaded documents that appear on the Forms tab and employee-uploaded documents that appear on the Documents tab.
Prepare a download package
Click this option to specify the Forms and uploaded documents to include in the download package.
Note: Supported file types are pdf, gif, jpeg, jpg, png, bmp, and tiff.
(Optional) Change the label of the Download Package button.
Include a Survey Form to fill out
Click this option to associate a survey with this task. Select the survey from the Pick Survey Form list.
Learning course options
Learning course options are available when you select the Create a Learning Task button on the Manage Task Definitions page.
Learning Course Selection
Select the Rival Learn eCourse to launch with this task. Only eCourses can be launched. Instructor-led courses and training events are not available for selection.
Categories & Assignment
Tasks are generated based on matching the category values assigned here in the task definition with the category values of the (event) benefiter. Keep in mind:
See also: Manage categories (Administration) — how to add, edit, retire, and manage category values for your organization.
- Categories are used to determine if tasks should be generated.
- One or more values must be selected for each of the categories. If the task is not category specific, chose All.
- Attributes are event information that is informative to carry with the event. This information may be useful for display or for system integration purposes.
Note: If you want to use a category value to generate a specific task for a category of employees, and you do not see it, please contact your administrator. The category may not be present on your event definition or it may be an event attribute that should be converted to an event category.
Entering the following information to specify the task assignment:
Checkbox overrides the category driven task generation
Selecting this check box overrides category-driven task generation. This means the task is set to manual selection and makes it available through the Add a Task option.
Categories
Use the drop-down search to select one or more category values.
If you want, you can exclude category values from a task definition. Check the Do not include these category values box, and make selections.
Tip: Category values in red are excluded. Categories in green are included.
Assignment
-
Use the radio buttons to select the type of user assigned to complete this task. Some radio buttons will present additional selection criteria to be more specific. Select from one of the task assignment options:
- Existing Employee: Default examples of this label are New Hire, Transferee and Exiting Employee. These are relative terms to assign the task to the user who benefits from the event.
-
An example of a task to be complete by the benefiter is a task to enter and submit an I-9 form.
No additional selection criteria is presented for the benefiter.
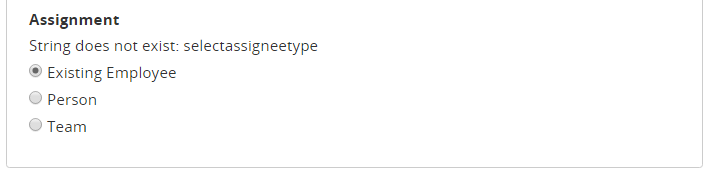
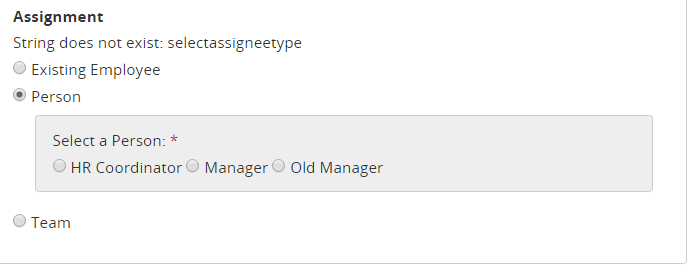
- Person: After selecting Person, additional selection criteria is shown so you can specify the person to be assigned this task. The selected Person is relative to the event benefiter.
-
When an event is launched, the Create Work Event pages collected the specific assignee for the (benefiting) employee.
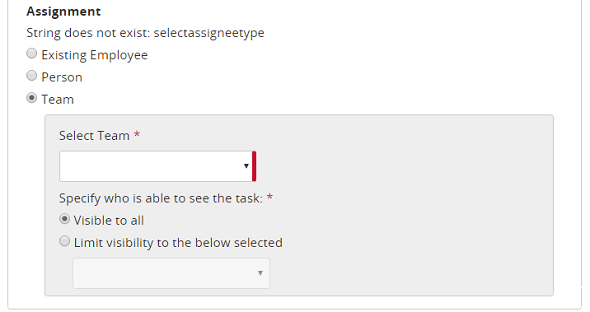
- Team: After selecting Team, an additional selection criteria is shown so you can select the team and a possible category match. Tasks with this assignment option appear in the Team Tasks tab of the Dashboard of the team members. Team tasks are not assigned until they are claimed.
-
You can narrow the team assignment (limit visibility) to a subset of the team members who match the selected category. For example, a task assignee in the HR Coordinators team can be restricted to seeing only the tasks for their locations for this event in their Team Tasks list.
Portal
Portal Roles
Portal roles allow you to show or hide content on portals based on category or event progress. Portal roles are created and maintained by Rival staff.
Here, you can specify that a portal role is assigned to or unassigned from the employee upon completion of this task. This allows the employee's portal experience to be customized based on where they are in the event's life cycle.
Assign Eprise Role: As a result of completing this task, you can assign the benefiter of the task to a privilege group. The portal may make links and/or menu items available based on the privileges defined in your portal content.
Unassign Eprise Role: As a result of completing this task, you can remove the benefiter of the task from a privilege group. The portal may make links and/or menu items available based on the privileges defined in your portal content.
-
Task Summary Employee Profile
Note: The same task summary display is used if it is viewed through the portal or interface.
Tasks & Dates
Task Dependencies
If the task has dependencies, they are shown here.
Before: If this task is dependent upon another task, you will see tasks listed that are completed before this task is activated.
After: If this task is a parent task, you will see tasks listed that will be activated as a result of this task being completed.
Task Dates
Note: Dates are calendar days, not business days. Calendar day is used in how task dates are generated. This includes weekends and your corporate holidays.
Activation date is
The task activation date is set in relation to either the work event creation date or a work event defined date. Zero days after a creation date equates to a task being activated when it is created.
Dependent tasks are activated when the parent task is completed and the activation date is met.
Tip: If the current task is a self-completing task, the activation date should be set to 0 days after the creation date. In most cases, when establishing a self-completing task (a task whose sole purpose is to send a milestone notification), the self-completing task is established as a dependent task.
Warning date is
The task warning date is set as a reminder for an approaching due date. Warnings dates generate two indicators:
Optional notifications. The Assignee of a task may optionally be sent a warning notification to alert them of an approaching due date.
Dashboard and Reporting status indicator. A task list viewed through the dashboard or a report displays an icon to indicate a task is in a warning status.
Task is due
The task due date is set in relation to the event creation date, activation date, or defined date.
Zero days after a creation date equates to a task being due when it is created.
Examples of effective dates are Start Date for an Onboarding event, Transfer Date for a transfer event and Termination Date for an Offboarding event.
Task will expire
Set whether the task can expire:
Schedule or manual: The task can be expired based on time schedule (set below) or manually by a permissioned user.
Only manual expiration: The task can only be manually expired by a permissioned user.
Do not allow expiration: The task cannot be expired.
(Only available if Schedule or manual option is selected) Task will expire date is set in relation to the event creation date, activation date, due date, or termination date.
Notifications
Notifications
Notifications can be sent for a task for these notification types:
Send Activation Emails
Send Warning Emails
Send Overdue Emails
Send Completion Emails
Send Expired Emails
Send Integration Notifications
By default, all these notifications are selected by default—except Send Integration Notifications. You can override the default notifications (administration level) for this specific task by de-selecting any of the notification types.
The timing of when notifications are sent is based on the task dates you defined for this task. If you have de-selected any of these notification types, the notification is not sent.
Triggers
Triggers
Triggers allows for the configuration of extra processing that can occur after a task is completed such as when a Form is completed or for task-initiated real time integration.
Here's a Form example. In a form you have to select whether you want a paper paycheck or direct deposit. If direct deposit is selected then a task gets added to the event for the new hire to complete their account information.
Edit a task
-
From the navigation bar, click Administration>Manage Events.
- From the Event List, click Edit Tasks for an event.
The Manage Task Definition page opens.
- For the task you want to edit, click the name link.
- Make changes.
- Click Save.
Clone a task
- You can clone an existing task to simplify creating a task definition. A cloned task is a duplicate of the original task, except for the Task Definition ID. Cloned tasks have the term Clone of as a prefix in the Task Definition ID.
- Cloning a task does not modify the original task.
-
If a task has already been launched in an event, some changes cause a task to clone automatically:
- Adding/changing/removing a Form associated with a task
- Adding/changing/removing a document associated with task
- Adding/changing/removing a document review association with a task
- Change a task to or from self-completing
- Adding/changing/removing triggers on a task
- Changing the assignee from/to a team to a named person
The cloned task is created with all the existing dependent tasks included and this warning message appears: The changes you have made to this task definition are incompatible with existing task instances. The changes have been saved in a clone of this task definition.
-
From the navigation bar, click Administration>Manage Events.
- From the Event list, click Edit Tasks for the corresponding event.
- The Manage Tasks Definitions page opens.
- For the task you want to clone, click
 .
. -
At the confirmation message, do one of the following:
- Click Group to duplicate the current task, and create the clone with the same dependency in the task hierarchy
- Click Unassociated to duplicate the current task and create it as an unassociated task in the task hierarchy. An unassociated task is activated when the event is launched (based on category criteria)
- For the cloned task, change the Task Definition ID and make other relevant modifications.
- Publish the updated task workflow.
If the original task detail information is modified, existing tasks (tasks generated by launched events) may be affected.
If the cloned task is modified (before it is published) no generated tasks exist, and therefore will not be affected.
If a task is cloned, and not modified (the original task or the cloned task) duplicate tasks exist in the task hierarchy.
If a task is cloned for creating a new task based on an old task, and the intent is to remove the original task from the task hierarchy, retire the original task.