Integrations and automation
Configure tasks that integrate with external systems, launch events, or connect to other applications.
Configuring task-initiated real time integration
A client administrator configures this feature by creating a task and turning on (enabling) the Send Integration Notifications notification. The administrator can then add one or more integrations to be called. Under the Notifications tab, select Send Integration Notifications:
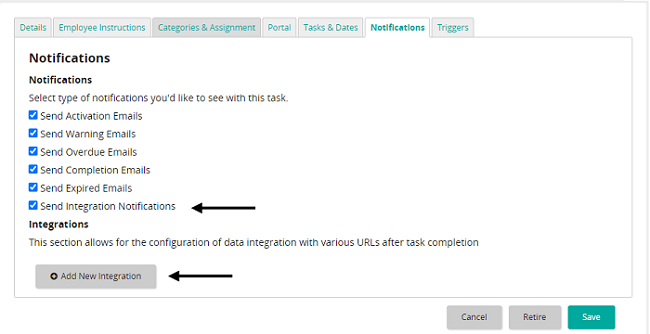
Then click Add New Integration, and provide the URL to be called along with any static text to include:
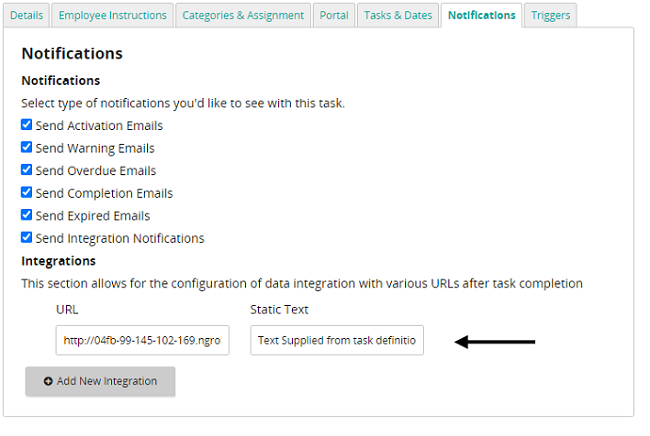
Tip: More than one integration can be configured in each task. Just click Add New Integration again and provide the URL and static text for each integration.
After the task is completed, the URL is called and the static text and information about the event benefiter is sent. That information can be used to identify the user so that an integration can pull the data that is needed.
The output payload will look like this:
{
"TaskDefintionId": 618,
"StaticText": "Text Supplied from task definition",
"ForWhomOwner": "66232081-399d-4bfe-8d59939fdf20c608",
"TaskCompletedBy": "",
"TaskCompletedDate": "2021-11-12T17:55:57.190Z",
"TaskDueDate": "2021-10-13T04:00:00.000Z",
"EventName": "Onboarding",
"EventId": 1,
"EventCode": "Event_1",
"FormObjectId": null
}
Note: If a Form is associated with the task, FormObjectId does not have a null value. Instead it contains the Form name.
Launching an event from a task
Launching an event from a task has these advantages:
- New hires can move seamlessly through events
- Someone other than an event coordinator can launch an event
- Improved workflow ensures employees are added to new events in a timely manner
Once a task is created, a new Triggers tab is available:
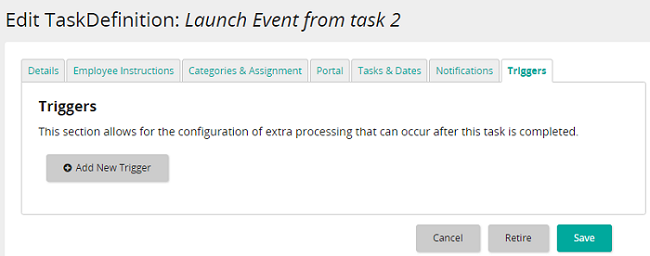
This is where you configure an event to be launched.
Tip: When a task is not set as self-completing, does not have a Form, document upload or download package associated to it, you can configure an event to be launched.
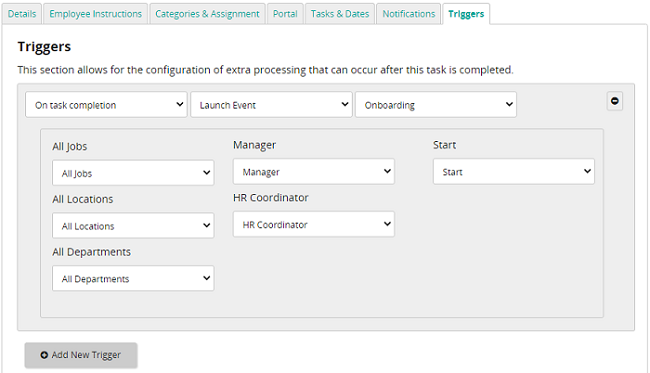
Click Add New Trigger to select the event to launch and map categories, people, and dates from the existing event that you want to pre-populate in the newly launched event. Any fiends not mapped will be blank and the task assignee must choose values for each field.
Create a task to launch a eCourse
- You must be on a team with the Manage Task Definition privilege to create a task.
- Only eCourses can be selected, and those eCourses must be in a course catalog configured to be recognized by Rival Workflow. Rival staff configure the course catalog connection.
- A Rival administrator user must be configured in Rival Workflow. Rival staff handle that configuration step.
- From the navigation bar, click Administration > Manage Events.
- In the list beside an event, click Edit Tasks.
The Manage Task Definitions page opens.
- Beside the Create Unassociated Task button, click
 and select Create Learning Task.
The Create Task Definition page opens with the Details tab selected.
-
In the Title field, enter a name for this task definition.
Tip: Best practice is to use an instructional type title in the Title field. Example: Complete the eCourse
- Complete the other fields on the Details tab as needed and then click Next.
-
On the Employees Instruction tab in the Employee Instructions field, do this:
- From the Learning Course Selection list, select an eCourse.
- Click Next.
- On the Categories & Assignments tab, select the type of user assigned to complete this task.
- Click Next and complete fields on all other tabs as needed.
- When done, click Finish & Save.
Create a task to launch multiple eCourses
- You must be on a team with the Manage Task Definition privilege to create a task.
- Only eCourses can be selected, and those eCourses must be in a course catalog configured to be recognized by Rival Workflow. Rival staff configure the course catalog connection.
- A Rival administrator user must be configured in Rival Workflow. Rival staff handle that configuration step.
- Up to 25 eCourses can be launched from a task.
- From the navigation bar, click Administration > Manage Events.
- In the list beside an event, click Edit Tasks.
The Manage Task Definitions page opens.
- Beside the Create Unassociated Task button, click and select Create Learning Task.
The Create Task Definition page opens with the Details tab selected.
-
In the Title field, enter a name for this task definition.
Tip: Best practice is to use an instructional type title in the Title field. Example: Complete the eCourse
- Complete the other fields on the Details tab as needed and then click Next.
-
On the Employees Instruction tab in the Employee Instructions field, do this:
- Type instructions for the eCourse. Example: Complete the eCourse
- From the Learning Course Selection list, select eCourses.
- Click Next.
- On the Categories & Assignments tab, select the type of user assigned to complete this task.
- Click Next and complete fields on all other tabs as needed.
- When done, click Finish & Save.
- On the confirmation pop-up, click Continue.
The system automatically creates multiple tasks—one for each of the selected eCourses. For example, if you selected four eCourses, the system creates four Learning tasks.
You can easily identify Learning tasks by this icon:

Include a survey form to fill out
- From the Employees Instruction tab, click Include a Survey Form to fill out.
- From the Include a Survey From to fill out list, select a survey.
-
Click Insert Survey Form or enter the keyword insertesurvey in the Employee Instructions field.
Note: If you forget to include this keyword, an instance of the survey will not be generated for this task.
- Click Next or Save.